Showing posts with label resources. Show all posts

Saturday, 18 September 2010

Composing a Text Page or Web Page

One of the most useful resources in Moodle is being able to add a Text or Web page, as it helps de-clutter your page and provide quick and easy information for your students. This lesson demonstrates how.

Choosing a Resource

media_1251118512864.png

The first step is to choose whether you want a Web or Text Page.

Hint: Web pages give you more flexibility, as described below.

Editing a Text Page
Editing_a_Text_Page.png

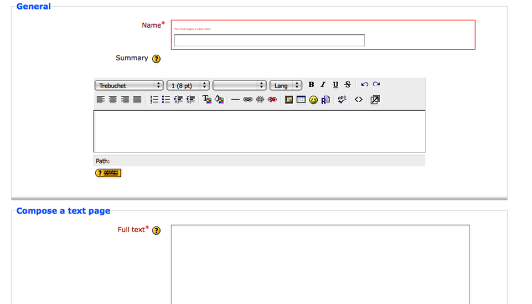
If you want to add a page of plain text, choose the 'Create a Text page' option.

Now you can give it a name, a summary (not essential) and enter your text in the square box.

Editing a Web Page

Editing_a_Web_Page.png

The Web Page works in exactly the same way, but notice that the Text area now has an HTML editing panel, so you can add images, music, YouTube, weblinks and more.

Text/Web Page window options

TextWeb_Page_window_options.png

Common to both the Text and Web page are the Window options. These allow you to specifiy what the web or text page will do.

For example, you may want your text box to be a small pop-out window. If so, you would change Window from Same Window to New Window.

You can then edit the window width and height (try experimenting!) and also choose what aspects of the window are on show, such as the toolbar or location bar.

Finish and save!
Finish_and_save_.png

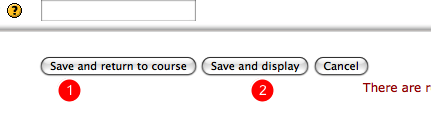
Now you've added your Text or Web page you need to save it!

1 = Saves the resource and takes you back to your Course page.
2 = Saves the resource but immediately shows it on display.

Web Page pop-up example

Web_Page_pop-up_example.png

You can see that, my clicking on the 'Example' resource a small pop-up window has been launched.

Adding a Resource

This lesson explores the various Resource options available. These include adding a text page, adding a web page, linking to a file or resource and adding a label.

Where to go

Where_to_go.png

Adding a Resource is a simple operation.

1. Go to your course that you teach on
2. Click the 'Add a Resouce...' drop down menu.

You can find out more information about the Resource types by clicking the ? icon.

Choosing a Resource

Choosing_a_Resource.png

You can now choose one of the numerous Resources available.

1. Book. Creates a Book-type format, with Chapters. Users can 'turn' pages.
2. Insert a label. Allows you to add text and images amongst other course content.
3. Compose a text page. Creates a page of text (no images or formatting).
4. Composing a web page. A more advanced text page, with HTML coding (e.g. YouTube), web links, formatting etc.
5. Link to a file or website. Hopefully self-explanatory, it allows you to upload a file (e.g. a sample pack) that students can download, or links directly to a webite.
6. Display a directory. An excellent tool if you are working with lots of files.
7. IMS content package. Not needed.
8. MrCute Jr. For searching and sharing resources.

Simply select the Resource you want to use and proceed to the next step.

Further tutorials can be found on each of the available Resources.